Showing posts with label VPN. Show all posts

Wednesday, August 26, 2015

How to Setup a VPN Gateway Server on Amazon VPC Using Ubuntu


In my last post, I’ve talked about setting up a site-to-site VPN using Sophos UTM 9 and strongSwan IPsec running on Amazon EC2 instance. So the idea was to create a VPC on AWS and connect this VPC to my home network. Setup on my last article works fine to connect to a single instance, but if we are to connect the entire VPC subnet to my home network subnet, I had to setup an instance as a gateway and route all the VPN traffic though that gateway. This is the instance I have installed strongSwan on. This involved setting up NAT on that instance.

Please refer the this post to see how to setup a IPSetup tunnel.

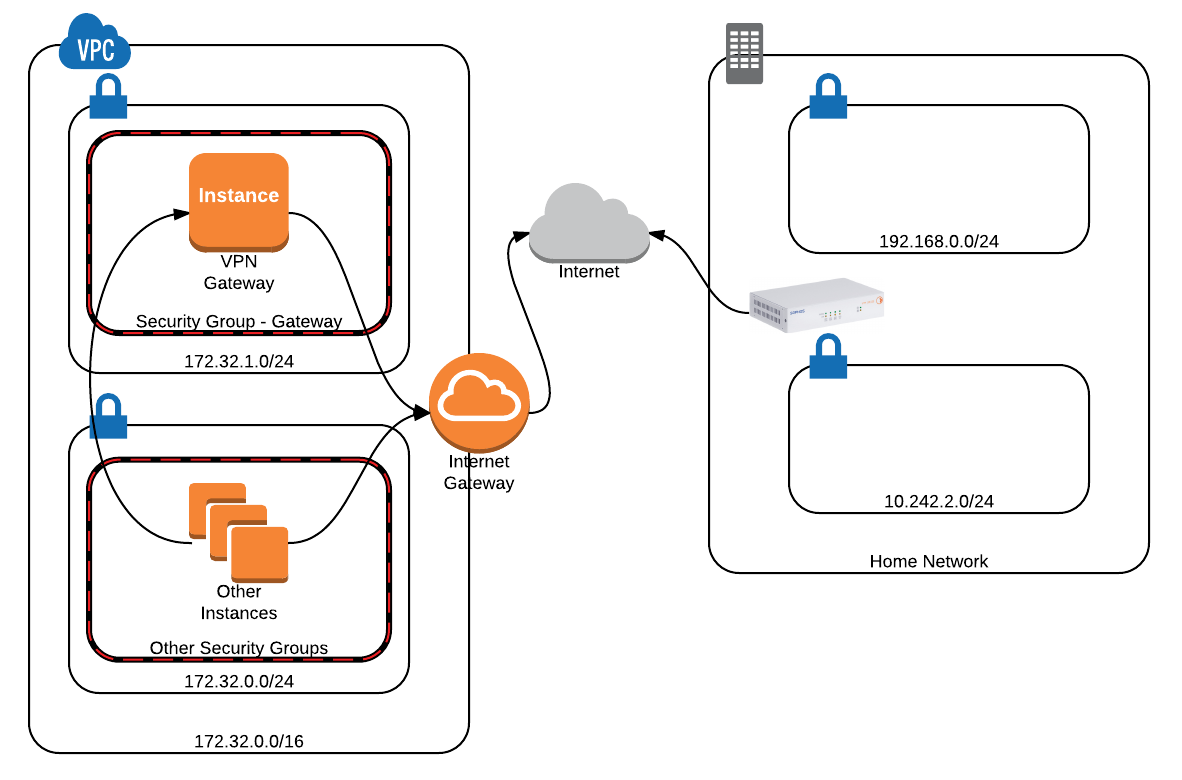
To recap, my AWS VPC has the CIDR block of 172.32.0.0/16. I have two subnets on my home network - 192.168.0.0/24 and 10.242.2.0/24. I have connected my home network and the VPC together using a IPSec tunnel.

Here's the setup in a digram.


Lets see how to do that. I have used Ubuntu free tier instance to setup the gateway.

First create a VPC as below. Also name them accordingly, because AWS IDs are hard to remember!


So my VPC has the CIDR block of 172.32.0.0/16

Setup 2 subnets on this VPC as below. I used 172.32.0.0/24 for the private subnet and 172.32.1.0/24 for the public subnet.


Now it's time to create a Internet Gateway. Please attach the internet gateway to the VPC we just created.


Now it's time to create 2 route tables. One for private subnet and one for public subnet.


We'll only configure the route table for the public subnet for now. We'll come back to the private one. This is a very simple route table. Anything other than local traffic, we'll route the Internet gateway.


That's it. Now run up a instance of Ubuntu on public subnet (172.32.1.0/24). You can use the basic settings. Nothing too fancy here. Use an Elastic IP so our public IP won't change when we stop and start this instance.


Create an assign a security group for this instance. I have called this security group "singapore-sg-vpc1-gateways". You'll need to allow connections such as SSH into this. As you can see below, I have  also opened up UDP port 500 and 4500. These ports are used by IPSec. I'm planning on setting this gateway as a VPN gateway as well.


Another tricky bit: Disable Source/Destination check on the instance


In few minutes, the new instance will start up and ready to be configured.

But before that, now we are ready to configure the route tables for the private subnet. I have added all my home network subnets to route though the VPN Gateway server (Ubuntu instance we've just setup). All the other Internet traffic will be routed though the Internet gateway. Have a look at the image below.


Now we are all done with AWS VPC configuration. Next thing to do is to configure the VPN Gateway Server to do NAT.

SSH into the VPN Gateway Server.

ssh -i ~/AWS_Key.pem ubuntu@XX.XX.XX.XX

Now run the following commands on the Gateway Server to make NAT work.

echo '#!/bin/sh echo 1 > /proc/sys/net/ipv4/ip_forward

iptables -t nat -A POSTROUTING -s 172.32.0.0/16 -j MASQUERADE ' | sudo tee /etc/network/if-pre-up.d/nat-setup

sudo chmod +x /etc/network/if-pre-up.d/nat-setup

sudo /etc/network/if-pre-up.d/nat-setup

That's it! Now we have the VPN Gateway Server working with NAT. Next thing I had to do was to setup a IPSec tunnel between my home Sophos UTM 9 and AWS VPC VPN Gateway Server we've just setup. Please follow this article to do so.

Please make sure to replace my CIDR blocks with your own, if you're following this article.

Monday, August 24, 2015

How to Connect a AWS VPC and Local Network via VPN Using Sophos UTM 9 and strongSwan

So few weeks ago, I finally finished setting up my home lab. I used Sophos UTM 9 as my gateway. There were few reasons for using Sophos UTM 9. Major one being it’s completely free for home use. Also it’s incredibly easy to configure. So with the gateway, I can VPN into my home network and use my local resources from anywhere. It might be a overkill for a home network, but if it can be done, why not?

Recently I’ve started using Amazon AWS for hosting my personal website. So I was thinking that it’d be nice, if I could monitor my AWS servers with the same monitoring system I use to monitor other machines on my home network. I use Nagios for this. I decided to join my AWS VPC to my home network via VPN. Easiest option was to buy a Sophos UTM 9 instance from AWS marketplace and use it as a VPN gateway, but it seemed like a huge waste of money given the fact Sophos UTM from AWS market place costs close to a grand a year.

I decided to look for open source VPN servers. That’s when I found strongSwan. It seemed easy to configure and I could just run it on a Ubuntu instance with minimal system requirements.
We are going to need a public IP for this instance. But setup a Elastic IP so it won't change when you stop and start the instance.

For more information about Sophos UTM click here.
For more information about strongSwan click here.

This is how to configure it.

Create a VPC on your AWS instance. I’m not going to talk setting it up here. Then start up a instance with Ubuntu. I used the free tier one.

Then we can start installing and Configuring strongSwan.

Run an update on the system first.

apt-get update

Then install strongSwan with apt-get

apt-get install strongswan
Now we have all the software we need. Next step is to configure strongSwan. In this configuration there are two important files.

/etc/ipsec.conf
/etc/ipsec.secrets

ipsec.conf file holds all configuration items related to strongSwan and ipsec.secrets file holds shared keys.

First we need to edit ipsec.conf file. Open the file with a text editor. I used vi.

vi /etc/ipsec.conf

And enter the following content. I’ll explain the context in a second.

conn %default
     ikelifetime=8h
     keylife=1h
     rekeymargin=3m
     keyingtries=%forever
     keyexchange=ike
     authby=psk
     ike=3des-sha1-modp1024
     esp=3des-md5-modp1536
     auto=route
     left=172.32.1.63
     leftid=ip-172-32-1-63
     leftfirewall=no
     right=vpn.achinthagunasekara.com
     rightid=@gateway1.achinthaguasekara.com

conn home_lan
     leftsubnet=172.32.0.0/16
     rightsubnet=192.168.0.0/24

conn home_ssl_vpn
     leftsubnet=172.32.0.0/16
     rightsubnet=10.242.2.0/24

As you can see we use Internet Key Exchange (ike) for this. If you use ike2 it won’t work, because Sophos UTM uses a older version of IPSec.

Then we need to configure our left (AWS) and right (Home Network) subnets. You’ll need to adjust these values to match your network configuration.
Have a look at the “right” configuration item. I used myvpn.achinthagunasekara.com as my IP address. I have a DNS entry that points myvpn.achinthagunasekara.com to my IP address. However my internet provider hasn’t provided me with a static IP, so I had to use No-IP service. Have a look at their website and it’s a free service. I won’t take about setting up dynamic DNS here.

Then I used gateway1.achinthaguasekara.com as my VPN ID for the UTM. I’ll talk about setting this up in a bit.

Also I have 2 subnets at home - 192.168.0.0/24 and 10.242.2.0/24. I have added a configuration item for each subnet above as you can see (home_lan, home_ssl_vp).

Now we are done with this file.

Next open ipsec.secrets file.

vi /etc/ipsec.secrets

All we need to enter here is our shared key between these two hosts. You’ll see some comments on the file, but ignore them and add this line to the bottom of the file.

172.32.0.10 myvpn.achinthagunasekara.com : PSK abc123

Again I have used myvpn.achinthagunasekara.com instead of the IP address. Make sure you enter the spaces in the above line as it is or it won’t work! (There is a space before : symbol and one more after it) Also I've used abc123 as the key here, but you should use something stronger.

Now you can start your IPsec server.

To start the server simply run the following command.

ipsec start

You can replace “start” with “stop” to stop the service or “status” to get the status of the service.

Now we are almost done with the configuration on AWS.

Last thing is we need to update the VPC route table to route all traffic for 192.168.0.0/24 to go though the VPN gateway (172.32.0.10).


Also make sure, your AWS Security Group is not blocking any UDP traffic on ports 500 and 4500 as below. These ports are used for IPsec communication.


That’s it. Now let's setup the UTM.

Login to the UTM.

Click on Site-to-Site VPN and then IPSec.

Now select Advanced tab and select Hostname as the VPN ID type. Enter your hostname as the VPN ID.


Now select Remote Gateways tab and add the newly created gateway as below.


Then enter the key we've setup earlier (abc123 in my case).

Then go to Connections and setup a new connection using the Remote Gateway as below.


As you can see, I have added both my home subnets to the Local Networks section - 192.168.0.0/24 and 10.242.2.0/24. Second subnet (10.242.2.0/24) is only used when remote users VPN into my UTM. I have added this to the tunnel so I can access my AWS VPC directly when I connect to my home network remotely using VPN.

Make sure to select all the local networks that must have access to this VPN tunnel.

If all working, you'll be able to see the tunnel is successfully established as below.

Troubleshooting

If you are having any issues, click on the Live Log button on the Sophos UTM.

Or tail the log messages on the strongSwan VPN gateway. Log files are located at /var/log/syslog

tail -f /var/log/syslog